How many of you love Indian food but when it comes to cooking it at home you have no clue where to start? I LOVE Indian food, the powerful flavors, punchy spices and health benefits keep me coming back for more. Recently I've been trying to incorporate more turkey into our diets, it is low in fat and high in protein. Plus like chicken it is very versatile.
This night in particular I had a package of turkey cutlets, I also had jasmine rice, Greek yogurt and plenty of spices. I combined them altogether for an easy, healthy, delicious Indian meal.
Easy Curry Turkey & Rice
4 turkey cutlets
1 cup Greek plain yogurt
2 cups jasmine/basmati rice
1 1/2 Tbsp curry powder
1 tsp salt + 1 tsp salt
pinch pepper
2 Tbsp butter
3 cups water
First you want to combine your Greek yogurt, salt and curry together into a thick paste. Then chop up your turkey into one inch chunks, add the turkey to the curry paste and use your hands to make sure every piece of turkey is covered. Then cover and let marinate for one hour in the refridgerator.
When the turkey is done marinating, add to an oven-safe pan and bake for 30 minutes at 350 degrees. While the turkey is baking, boil three cups water, add salt and rice. When the rice absorbs most of the water, add in the butter.
When the turkey is done, plate a big spoonful of the rice in a bowl and smother with the turkey and curry sauce. This plate will have your mouth saying "Dhanyawaad!"(Thank you in Hindu).
Enjoy! xo Lo
Showing posts with label oven. Show all posts
Wednesday, February 29, 2012
Wednesday, October 26, 2011
Trick or Treat Casserole
My mom used to make this warm, comforting casserole dish with chicken, orzo, cream of mushroom soup, mushrooms and any other veggies we had at the time. I decided to recreate this delicious meal from my childhood. I already had beer brined chicken, the orzo and cream of mushroom soup, I just needed to put the rest together.
Since Halloween is right around the corner, I decided to make my casserole similar to the traditional outing every child makes on October 31st, decked in their best costume to boot. My casserole would be full of treats and would remind adults why they love Halloween and the Fall season so much.
Trick or Treat Casserole
2 chicken breasts (marinated in whatever you prefer)
1 package of orzo noodles
6 button mushrooms (rinsed)
1/2 head of cabbage
1 can of cream of mushroom soup
2 cups of chicken stock
1 small yellow onion
2 Tbsp olive oil
salt
pepper
Heat your Dutch oven or large pot on medium heat, add olive oil and start chopping your onion. Add onion to the Dutch oven and start chopping your mushrooms. Add mushrooms and dry orzo to the pot. Let the orzo crisp up with the onions and mushrooms before adding any liquid. (You may need to add more olive oil, to prevent sticking to the bottom or getting too dry). Next add the chicken stock and stir around. Chop up half the cabbage and add that to the mixture. Pour in the cream of mushroom soup, salt and pepper. Then chop up the chicken into small pieces and add to pot. Place lid on the Dutch oven and cook for 10 minutes. Then finish the casserole in the oven at 375 covered for 15 minutes then lower heat to 350 and remove lid to let the top crisp up for 10 minutes before serving.
This meal will feel like your mouth is trick or treating, full of flavors, textures and nutrients this meal is Halloween approved!
Happy trick or treating! xo Lo
Since Halloween is right around the corner, I decided to make my casserole similar to the traditional outing every child makes on October 31st, decked in their best costume to boot. My casserole would be full of treats and would remind adults why they love Halloween and the Fall season so much.
Trick or Treat Casserole
2 chicken breasts (marinated in whatever you prefer)
1 package of orzo noodles
6 button mushrooms (rinsed)
1/2 head of cabbage
1 can of cream of mushroom soup
2 cups of chicken stock
1 small yellow onion
2 Tbsp olive oil
salt
pepper
Heat your Dutch oven or large pot on medium heat, add olive oil and start chopping your onion. Add onion to the Dutch oven and start chopping your mushrooms. Add mushrooms and dry orzo to the pot. Let the orzo crisp up with the onions and mushrooms before adding any liquid. (You may need to add more olive oil, to prevent sticking to the bottom or getting too dry). Next add the chicken stock and stir around. Chop up half the cabbage and add that to the mixture. Pour in the cream of mushroom soup, salt and pepper. Then chop up the chicken into small pieces and add to pot. Place lid on the Dutch oven and cook for 10 minutes. Then finish the casserole in the oven at 375 covered for 15 minutes then lower heat to 350 and remove lid to let the top crisp up for 10 minutes before serving.
This meal will feel like your mouth is trick or treating, full of flavors, textures and nutrients this meal is Halloween approved!
Happy trick or treating! xo Lo
Thursday, October 13, 2011
My First Emergency Chef Wound
I recently decided to embark on a fantastical, delicious, healthy meal of raspberry and pistachio encrusted chicken. As the chicken bathed in the aroma of raspberry, hints of mustard and crushed pistachio, I decided to move the sizzling pot from the top of the stove and into the oven at 375 degrees. After some time, I pulled the grill pan with plump chicken out of the steaming oven. Then after a few more minutes my buzzing mind seemed to have forgotten about the sizzling grill pan handle and as I grabbed the handle which it's appearance lied about just how hot it actually was. I simply wanted to serve the meal that I strived to make so perfect, the pan was extremely heavy and as I grabbed the silver pan handle, I gripped tightly in order to not drop the marvelous meal I revered over for an hour. Once my nerves alerted my hand which alerted my brain that my skin was now touching a handle of 375 degrees I dropped the pan and ran hysterically across our apartment.

This being our first emergency (knock on wood) in our marriage, my husband leapt up and tried to be of assistance to me in my time of painful need. If you ever burn your hand on extreme heat, the first thing you need to do after you are done screaming out in immense pain. Run that body part under cool water from the faucet for about 30 minutes, then make sure you have a lot of extra strength ibuprofen, do not cover for at least 12 hours until the painful heat feeling ends. Once you stop letting water run over your body part you'll probably want to submerge the burned area into icy cold water. This is fine, then eventually you will want to cover the wound and use some burn gel to relieve the pain. The skin will eventually start to bubble up, do not pick at the blisters, let them heal slowly, you do not want an infection to occur. If the blisters start to crack, put neosporin on them to help keep them supple and from breaking open. Eventually the new skin will take over. If you ever see bone, muscle, if your skin is melted you need to go to the emergency room as soon as possible.

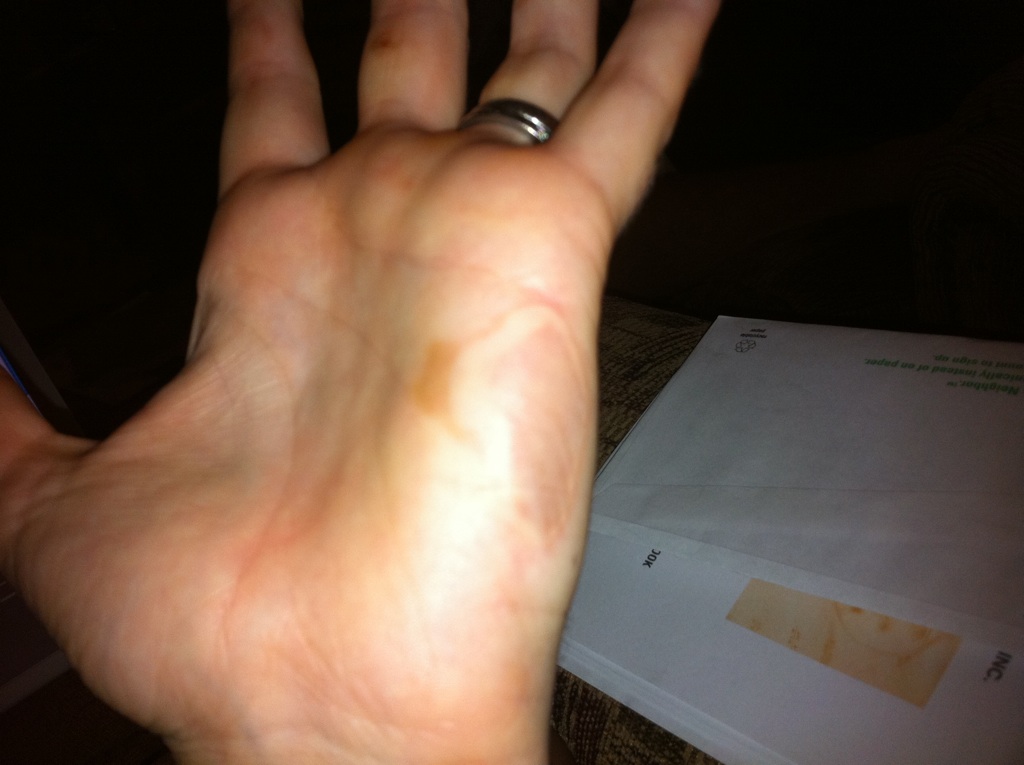
The pictures I posted are after one day, after four days and after one week. After I finished running my hand under water I dunked it in a icy bath. My husband tried to help bandage it but that just seemed to trap the heat (aka fiery pain) inside my hand. I screamed and hollered and we eventually figured out that bandaging my wound was not a bright idea, so then I dunked my radiating hand back into the icy water. I had to keep an ice pack on my hand for the next 12 hours before the fiery pain would finally stop. Then the bubbly blisters started to appear, I kept my hand bandaged and kept taking 3-4 ibuprofen every four hours to keep the pain away. It has been 9 days so far and my blister on the lower part of my palm is still there but the rest of my hand has pretty much healed.

Take care of yourself and try not to get so caught up in your cooking where you get harmed.
xoxo Safety first! xo Lo

This being our first emergency (knock on wood) in our marriage, my husband leapt up and tried to be of assistance to me in my time of painful need. If you ever burn your hand on extreme heat, the first thing you need to do after you are done screaming out in immense pain. Run that body part under cool water from the faucet for about 30 minutes, then make sure you have a lot of extra strength ibuprofen, do not cover for at least 12 hours until the painful heat feeling ends. Once you stop letting water run over your body part you'll probably want to submerge the burned area into icy cold water. This is fine, then eventually you will want to cover the wound and use some burn gel to relieve the pain. The skin will eventually start to bubble up, do not pick at the blisters, let them heal slowly, you do not want an infection to occur. If the blisters start to crack, put neosporin on them to help keep them supple and from breaking open. Eventually the new skin will take over. If you ever see bone, muscle, if your skin is melted you need to go to the emergency room as soon as possible.

The pictures I posted are after one day, after four days and after one week. After I finished running my hand under water I dunked it in a icy bath. My husband tried to help bandage it but that just seemed to trap the heat (aka fiery pain) inside my hand. I screamed and hollered and we eventually figured out that bandaging my wound was not a bright idea, so then I dunked my radiating hand back into the icy water. I had to keep an ice pack on my hand for the next 12 hours before the fiery pain would finally stop. Then the bubbly blisters started to appear, I kept my hand bandaged and kept taking 3-4 ibuprofen every four hours to keep the pain away. It has been 9 days so far and my blister on the lower part of my palm is still there but the rest of my hand has pretty much healed.

Take care of yourself and try not to get so caught up in your cooking where you get harmed.
xoxo Safety first! xo Lo
Thursday, August 4, 2011
Bakin' it up!
Some days are just great days to spend in the kitchen, hands deep in flour with an apron on. I love baking! For my wedding I created welcome bags for all my out of town guests...and all of my family were out of town guests. So with 30 welcome bags to be made, there needed to be a sweet, homemade element. I had once seen a Texas sugar cookie with a mini red heart on it in a bakery, every since then I knew I wanted to make this for my wedding. Since all of my family came from all over the United States, this Texas cookie would work perfect.
You of course do not have to make Texas cookies, they could be in any shape. What I really want to show you is the wonderful sugar cookie recipe. I also added the blue heart because my favorite color is blue, you could dye your dough any color to your lovely cookie confection.
Texas Sugar Cookies
1 large egg
2 1/4 tsp vanilla extract
1 cup unsalted butter (2 sticks)
3/4 cup sugar
1/4 tsp salt
2 cups flour
Whisk egg and vanilla into a small bowl and set aside. In a standing mixer, cream butter until fluffy, scrape sides of bowl and add sugar. Beat until light, add egg mixture and beat for about one minute. Add the salt to the flour in a separate bowl, reduce speed and slowly add flour mixture to wet ingredients. Just mix til blended, do not over mix.
Remove dough from the bowl and place on a floured surface. Roll out dough to about a 1/4 inch thick surface. Use your cookie cutters to make whichever patterns you'd like. If you want to create a colored cookie part to place on your sugar cookie, take part of your dough, add whichever color you'd like and mix thoroughly. Bake cookies for 8 minutes at 350 degrees.
Cherry Brownies
1 cup softened butter
4 squares of semi-sweet chocolate (4 oz)
2 cups sugar
1 tsp vanilla
1 Tbsp ground coffee
3 eggs
1 cup flour
1/2 tsp salt
1 cup chopped candied cherries (you can use fresh or dried as well)
My husband and I were invited to a pool party a few weeks ago, I decided I wanted to make brownies with my new standing mixer. I didn't have any nuts but we had ground coffee and candied cherries. First I put a double boiler onto the stove to melt my chocolate squares. If you don't have a double boiler, simply put a metal bowl over a sauce pan which has about a cup of water in it. You don't want the water to touch the bottom of the bowl.
Place butter, sugar and vanilla into the mixer, mix for about 30 seconds. Turn the speed up and beat for about two minutes. Turn the speed down slightly, add eggs, one at a time. Stop and scrape the bowl. Add melted chocolate mixture, turn down speed. Add all remaining ingredients and mix til blended, do not over mix (30 seconds). Pour into a greased and floured baking pan. Bake at 350 degrees for 45 minutes.
These delectable desserts will have your mouth jumping for joy! Simple sugar cookies with a little flair and chocolatey brownies with soothing hints of coffee and gooey pieces of candied cherry. YUM!
Enjoy! xo Lo
You of course do not have to make Texas cookies, they could be in any shape. What I really want to show you is the wonderful sugar cookie recipe. I also added the blue heart because my favorite color is blue, you could dye your dough any color to your lovely cookie confection.
Texas Sugar Cookies
1 large egg
2 1/4 tsp vanilla extract
1 cup unsalted butter (2 sticks)
3/4 cup sugar
1/4 tsp salt
2 cups flour
Whisk egg and vanilla into a small bowl and set aside. In a standing mixer, cream butter until fluffy, scrape sides of bowl and add sugar. Beat until light, add egg mixture and beat for about one minute. Add the salt to the flour in a separate bowl, reduce speed and slowly add flour mixture to wet ingredients. Just mix til blended, do not over mix.
Remove dough from the bowl and place on a floured surface. Roll out dough to about a 1/4 inch thick surface. Use your cookie cutters to make whichever patterns you'd like. If you want to create a colored cookie part to place on your sugar cookie, take part of your dough, add whichever color you'd like and mix thoroughly. Bake cookies for 8 minutes at 350 degrees.
Cherry Brownies
1 cup softened butter
4 squares of semi-sweet chocolate (4 oz)
2 cups sugar
1 tsp vanilla
1 Tbsp ground coffee
3 eggs
1 cup flour
1/2 tsp salt
1 cup chopped candied cherries (you can use fresh or dried as well)
My husband and I were invited to a pool party a few weeks ago, I decided I wanted to make brownies with my new standing mixer. I didn't have any nuts but we had ground coffee and candied cherries. First I put a double boiler onto the stove to melt my chocolate squares. If you don't have a double boiler, simply put a metal bowl over a sauce pan which has about a cup of water in it. You don't want the water to touch the bottom of the bowl.
Place butter, sugar and vanilla into the mixer, mix for about 30 seconds. Turn the speed up and beat for about two minutes. Turn the speed down slightly, add eggs, one at a time. Stop and scrape the bowl. Add melted chocolate mixture, turn down speed. Add all remaining ingredients and mix til blended, do not over mix (30 seconds). Pour into a greased and floured baking pan. Bake at 350 degrees for 45 minutes.
These delectable desserts will have your mouth jumping for joy! Simple sugar cookies with a little flair and chocolatey brownies with soothing hints of coffee and gooey pieces of candied cherry. YUM!
Enjoy! xo Lo
Tuesday, August 2, 2011
Refreshing Picnic Lunch
Summer days are perfect for lazy, picnic lunches under an Oak tree. Too bad in Texas that would only be possible @ 7 am or 9 pm...but luckily the Northern states have gorgeous summers which are perfect for picnics.
If I was living in say Connecticut, upstate New York, Northern California or Washington state... I would make these lovely, refreshing, healthy items; tropical fruit salad, field green salad with strawberries and soft-boiled eggs as well as homemade, freshly baked sesame seed French bread.
Tropical Fruit Salad
3 kiwis sliced
2 mangos sliced
2 bananas
3 Gala apples
3 nectarines
squeeze of fresh lemon juice
1 Tbsp lemon zest
After slicing up all the fruit, place in a bowl and toss with fresh lemon juice and lemon zest to keep the fruit fresh and tasty. Super easy and healthy.
Field Green Salad with Fresh Lemon Vinaigrette
2 cups field greens
1 English cucumber
handful of strawberries, sliced
2 Roma tomatoes
3 soft-boiled eggs (bring eggs to boil then turn off heat & let sit for 15 minutes)
Agave-Lemon Vinaigrette
1 lemon
1/2 cup olive oil
pinch salt
pinch pepper
1 tsp parsley
1 Tbsp agave nectar
Squeeze lemon juice into a bowl, whisk in olive oil, agave nectar and seasoning.
Once you assemble the salad, drizzle the fresh dressing over the top. The lemon will bring out the flavors in the strawberries, tomatoes and cucumber.
Sesame Seed French Bread
5 1/4 cups organic unbleached flour
1/2 cup organic low-fat milk
1 cup warm water
2 packages of active dry yeast
3 Tbsp of butter
2 Tbsp sugar
2 tsp salt
1/2 tsp sesame seeds
pinch salt
pinch pepper
Add milk, sugar, salt and butter into a saucepan over low heat. Let butter melt and sugar dissolve, add active dry yeast packages to lukewarm milk mixture. Once the yeast has dissolved, pour into mixer. Add in 4 1/2 cups of flour and warm water- mix on level two for one minute. Slowly add in the rest of flour 1/4 cup at a time. Keep mixing at level two until the flour begins to stick together and pulls off all extra dough off the bottom and sides of bowl. Knead dough on level two for one minute then place dough into a greased (with butter or Pam) bowl. Cover bowl with a damp towel and place in a warm, room temperature area to rise. Let dough rise for one hour. Once dough has doubled in size place on floured surface and punch out dough. Split dough into two halves. For one half I cut three long strips and braided them for a pretty bread design. I drizzled with olive oil, salt, pepper and sesame seeds then placed on a greased baking sheet into the oven at 400 degrees for 25 minutes.
For the other half I rolled the dough out, drizzled with olive oil and sprinkled on salt, pepper, oregano and basil then rolled the dough up almost like a jelly roll. This would fold in all the spices. Then I placed in a greased bread pan, drizzled the very top with olive oil and sprinkled with stone-ground oats for a nice finish.
Pack all these homemade items up in a picnic basket, grab a blanket, ice tea and spend a lazy day outside snacking on these refreshing, healthy foods!
Enjoy xoxo Lo
If I was living in say Connecticut, upstate New York, Northern California or Washington state... I would make these lovely, refreshing, healthy items; tropical fruit salad, field green salad with strawberries and soft-boiled eggs as well as homemade, freshly baked sesame seed French bread.
Tropical Fruit Salad
3 kiwis sliced
2 mangos sliced
2 bananas
3 Gala apples
3 nectarines
squeeze of fresh lemon juice
1 Tbsp lemon zest
After slicing up all the fruit, place in a bowl and toss with fresh lemon juice and lemon zest to keep the fruit fresh and tasty. Super easy and healthy.
Field Green Salad with Fresh Lemon Vinaigrette
2 cups field greens
1 English cucumber
handful of strawberries, sliced
2 Roma tomatoes
3 soft-boiled eggs (bring eggs to boil then turn off heat & let sit for 15 minutes)
Agave-Lemon Vinaigrette
1 lemon
1/2 cup olive oil
pinch salt
pinch pepper
1 tsp parsley
1 Tbsp agave nectar
Squeeze lemon juice into a bowl, whisk in olive oil, agave nectar and seasoning.
Once you assemble the salad, drizzle the fresh dressing over the top. The lemon will bring out the flavors in the strawberries, tomatoes and cucumber.
Sesame Seed French Bread
5 1/4 cups organic unbleached flour
1/2 cup organic low-fat milk
1 cup warm water
2 packages of active dry yeast
3 Tbsp of butter
2 Tbsp sugar
2 tsp salt
1/2 tsp sesame seeds
pinch salt
pinch pepper
Add milk, sugar, salt and butter into a saucepan over low heat. Let butter melt and sugar dissolve, add active dry yeast packages to lukewarm milk mixture. Once the yeast has dissolved, pour into mixer. Add in 4 1/2 cups of flour and warm water- mix on level two for one minute. Slowly add in the rest of flour 1/4 cup at a time. Keep mixing at level two until the flour begins to stick together and pulls off all extra dough off the bottom and sides of bowl. Knead dough on level two for one minute then place dough into a greased (with butter or Pam) bowl. Cover bowl with a damp towel and place in a warm, room temperature area to rise. Let dough rise for one hour. Once dough has doubled in size place on floured surface and punch out dough. Split dough into two halves. For one half I cut three long strips and braided them for a pretty bread design. I drizzled with olive oil, salt, pepper and sesame seeds then placed on a greased baking sheet into the oven at 400 degrees for 25 minutes.
For the other half I rolled the dough out, drizzled with olive oil and sprinkled on salt, pepper, oregano and basil then rolled the dough up almost like a jelly roll. This would fold in all the spices. Then I placed in a greased bread pan, drizzled the very top with olive oil and sprinkled with stone-ground oats for a nice finish.
Pack all these homemade items up in a picnic basket, grab a blanket, ice tea and spend a lazy day outside snacking on these refreshing, healthy foods!
Enjoy xoxo Lo
Thursday, July 28, 2011
Restaurant Style Dinner
After a girl's night with my great friend Amanda Kordes, an aspiring chef, who had gone to Culinary School in Kentucky, I learned a few new tricks to help take my meals up to the next level. This particular night for dinner I had flank steak, leftover veggies, arborio rice (Italian-Style risotto rice), rye bread, leftover enchilada sauce, queso fresco and swiss cheese.With all of that I made this restaurant-worthy dish:
Savory Spice-Crusted Flank Steak
2 lbs flank steak
1 clove chopped garlic
1 Tbs flour
1 tsp paprika
pinch of cayenne pepper
1/2 tsp cumin
pinch salt
pinch pepper
With the flank steak, I chopped up my garlic then I sprinkled that all over my steak. Next, I combined the savory spices and flour to create a flavorful crust. I dipped the flank steak into this spice rub and made sure every inch was covered. I put my grill pan on medium-high heat, drizzled with olive oil and laid the flank steak on the grill pan. The grill pan helps create a lovely crust, grill marks and juicy flavor.
Creamy Mushroom Risotto
1 cup Arborio rice
1 1/2 cups chicken stock
olive oil
pinch salt
pinch pepper
5 button mushrooms
1 garlic clove
1/4 chopped yellow onion
1/4 cup grated swiss cheese
1/4 cup crumbled queso fresco
I begin by boiling my chicken stock then adding the risotto with a touch of olive oil, stirring occasionally. Meanwhile, I slice my mushrooms, chop my onion and chop my garlic. After about 15 minutes I add the onion, mushroom and garlic to a saute pan on medium heat. Once the risotto is soaking up the rice and beginning to fluff up, I add the mushroom mixture with a pinch of salt and pepper. I cover and turn down the heat to low.
Vegetable Ratatouille
While my steak was cooking, I decided to use my leftover veggies to create a ratatouille.
1/2 zucchini
1/2 yellow squash
3/4 cup brussel sprouts
1 can chopped tomatoes
1/2 cup okra
1/4 cup black beans
Italian seasoning
I took a bowl, poured in the chopped tomatoes with the juice, Italian seasoning and all the veggies. I combined the flavors then drizzled olive oil on a baking sheet. I lined the veggies in a pretty, colorful pattern then baked at 400 degrees for 25 minutes.
Spanish Bruschetta
2 slices of bread (any bread will work)
leftover enchilada sauce (or marinara sauce)
1/8 cup grated swiss cheese
1/8 cup of crumbled queso fresco
pinch basil
pinch oregano
salt
pepper
I cut my bread in half and grated the cheese, then combined the cheese with the sauce mixture and sprinkled the seasoning in. I mixed that together and spooned the mixture on top of the bread, I turn on the broiler and placed the bruschetta under the broiler for 5 minutes to crisp and bubble up.
My husband and I prefer our meat medium-rare, if you want to know what temperature your meat is feel the meaty part of your palm. With no clinch of your fist that is what rare feels like, then take your thumb and touch each finger, that meaty party of your hand will firm up as you make your way down to your pinky which is well-done. I took the meat off the pan and let it rest for a few minutes on a cutting board. Meanwhile I added the cheese to the risotto and stirred that up. I checked on my veggies and took them out with the bruschetta. I sliced up the flank steak and served the steak on a bed of risotto with a side of vegetable ratatouille and Spanish bruschetta toast points.
Enjoy!!
xo Lo
Savory Spice-Crusted Flank Steak
2 lbs flank steak
1 clove chopped garlic
1 Tbs flour
1 tsp paprika
pinch of cayenne pepper
1/2 tsp cumin
pinch salt
pinch pepper
With the flank steak, I chopped up my garlic then I sprinkled that all over my steak. Next, I combined the savory spices and flour to create a flavorful crust. I dipped the flank steak into this spice rub and made sure every inch was covered. I put my grill pan on medium-high heat, drizzled with olive oil and laid the flank steak on the grill pan. The grill pan helps create a lovely crust, grill marks and juicy flavor.
Creamy Mushroom Risotto
1 cup Arborio rice
1 1/2 cups chicken stock
olive oil
pinch salt
pinch pepper
5 button mushrooms
1 garlic clove
1/4 chopped yellow onion
1/4 cup grated swiss cheese
1/4 cup crumbled queso fresco
I begin by boiling my chicken stock then adding the risotto with a touch of olive oil, stirring occasionally. Meanwhile, I slice my mushrooms, chop my onion and chop my garlic. After about 15 minutes I add the onion, mushroom and garlic to a saute pan on medium heat. Once the risotto is soaking up the rice and beginning to fluff up, I add the mushroom mixture with a pinch of salt and pepper. I cover and turn down the heat to low.
Vegetable Ratatouille
While my steak was cooking, I decided to use my leftover veggies to create a ratatouille.
1/2 zucchini
1/2 yellow squash
3/4 cup brussel sprouts
1 can chopped tomatoes
1/2 cup okra
1/4 cup black beans
Italian seasoning
I took a bowl, poured in the chopped tomatoes with the juice, Italian seasoning and all the veggies. I combined the flavors then drizzled olive oil on a baking sheet. I lined the veggies in a pretty, colorful pattern then baked at 400 degrees for 25 minutes.
Spanish Bruschetta
2 slices of bread (any bread will work)
leftover enchilada sauce (or marinara sauce)
1/8 cup grated swiss cheese
1/8 cup of crumbled queso fresco
pinch basil
pinch oregano
salt
pepper
I cut my bread in half and grated the cheese, then combined the cheese with the sauce mixture and sprinkled the seasoning in. I mixed that together and spooned the mixture on top of the bread, I turn on the broiler and placed the bruschetta under the broiler for 5 minutes to crisp and bubble up.
My husband and I prefer our meat medium-rare, if you want to know what temperature your meat is feel the meaty part of your palm. With no clinch of your fist that is what rare feels like, then take your thumb and touch each finger, that meaty party of your hand will firm up as you make your way down to your pinky which is well-done. I took the meat off the pan and let it rest for a few minutes on a cutting board. Meanwhile I added the cheese to the risotto and stirred that up. I checked on my veggies and took them out with the bruschetta. I sliced up the flank steak and served the steak on a bed of risotto with a side of vegetable ratatouille and Spanish bruschetta toast points.
Enjoy!!
xo Lo
Labels:
bread,
broiler,
bruschetta,
cheese,
family,
friends,
marinara sauce,
meat,
olive oil,
oven,
restaurant,
rice,
risotto,
seasoning,
steak,
summer,
temperature,
vegetables
Subscribe to:
Posts (Atom)