Showing posts with label cooking. Show all posts

Thursday, October 13, 2011

My First Emergency Chef Wound

I recently decided to embark on a fantastical, delicious, healthy meal of raspberry and pistachio encrusted chicken. As the chicken bathed in the aroma of raspberry, hints of mustard and crushed pistachio, I decided to move the sizzling pot from the top of the stove and into the oven at 375 degrees. After some time, I pulled the grill pan with plump chicken out of the steaming oven. Then after a few more minutes my buzzing mind seemed to have forgotten about the sizzling grill pan handle and as I grabbed the handle which it's appearance lied about just how hot it actually was. I simply wanted to serve the meal that I strived to make so perfect, the pan was extremely heavy and as I grabbed the silver pan handle, I gripped tightly in order to not drop the marvelous meal I revered over for an hour. Once my nerves alerted my hand which alerted my brain that my skin was now touching a handle of 375 degrees I dropped the pan and ran hysterically across our apartment.


This being our first emergency (knock on wood) in our marriage, my husband leapt up and tried to be of assistance to me in my time of painful need. If you ever burn your hand on extreme heat, the first thing you need to do after you are done screaming out in immense pain. Run that body part under cool water from the faucet for about 30 minutes, then make sure you have a lot of extra strength ibuprofen, do not cover for at least 12 hours until the painful heat feeling ends. Once you stop letting water run over your body part you'll probably want to submerge the burned area into icy cold water. This is fine, then eventually you will want to cover the wound and use some burn gel to relieve the pain. The skin will eventually start to bubble up, do not pick at the blisters, let them heal slowly, you do not want an infection to occur. If the blisters start to crack, put neosporin on them to help keep them supple and from breaking open. Eventually the new skin will take over. If you ever see bone, muscle, if your skin is melted you need to go to the emergency room as soon as possible.


The pictures I posted are after one day, after four days and after one week. After I finished running my hand under water I dunked it in a icy bath. My husband tried to help bandage it but that just seemed to trap the heat (aka fiery pain) inside my hand. I screamed and hollered and we eventually figured out that bandaging my wound was not a bright idea, so then I dunked my radiating hand back into the icy water. I had to keep an ice pack on my hand for the next 12 hours before the fiery pain would finally stop. Then the bubbly blisters started to appear, I kept my hand bandaged and kept taking 3-4 ibuprofen every four hours to keep the pain away. It has been 9 days so far and my blister on the lower part of my palm is still there but the rest of my hand has pretty much healed.
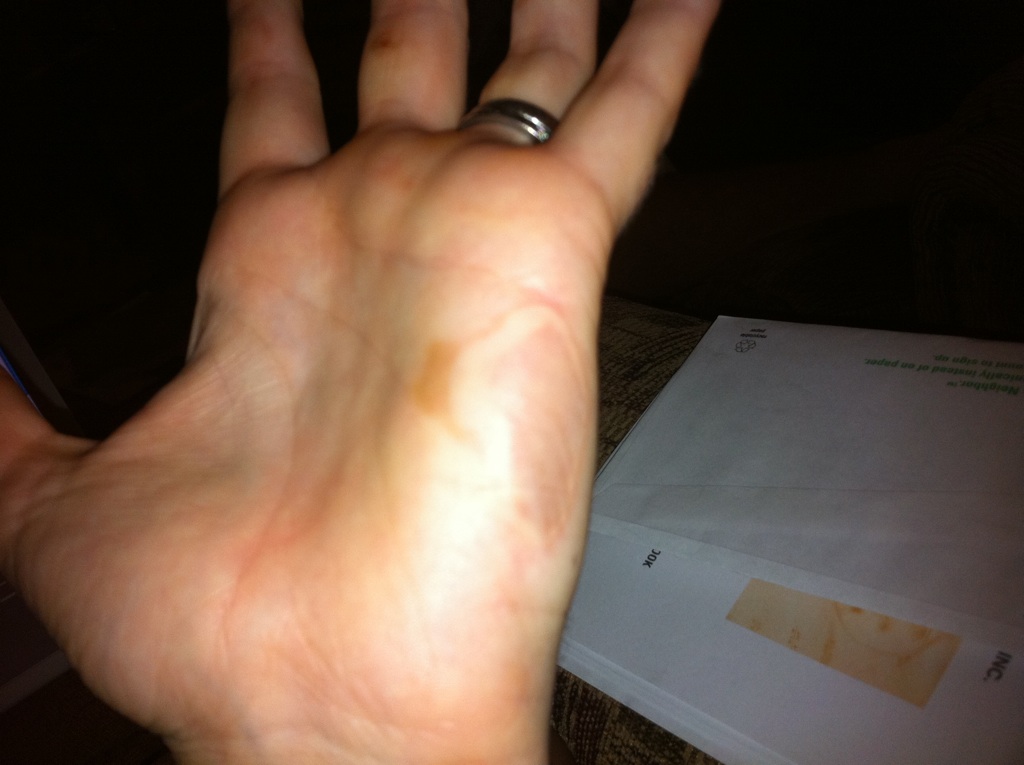


Take care of yourself and try not to get so caught up in your cooking where you get harmed.

xoxo Safety first! xo Lo

Saturday, July 23, 2011

Ay Mamacita! Chicken Enchiladas Suizas

Yesterday was my husband's mother's birthday, she passed away 10 years ago and would've been 57 years old. We decided we wanted to celebrate her birthday and memory by eating what she would've eaten. My husband tells me she loved hamburgers, Dr. Pepper and Mexican food...so he put me up to the challenge to make some homemade enchiladas.

After stopping by the grocery store for our necessities I got to work, if you have a dutch oven or large sauce pan grab it and follow the recipe below.

Ingredient List

3 cups water
2 cups chicken stock (always better than chicken broth)
2-3 lbs of roma tomatoes
2 jalapeno peppers
1 yellow onion
3 bone-in, skin-on chicken breasts
1/3 cup of Mexican crema (or sour cream...but Mexican crema is miles better)
1/3 cup Queso Fresca (white Mexican crumbly cheese)
12 white, corn tortillas (try to get the "homemade" kind)
2 bay leaves
3 cloves garlic
1/2 cup vegetable, canola or olive oil (for frying)
2 Tbs olive oil
1 can of black beans
salt & pepper


The first thing you want to do is put 3 cups of water, 2 cups of chicken stock, chicken breasts, bay leaves, 2 cloves of garlic (whole) , salt and pepper into your dutch oven or large sauce pan, turn it up on medium-high heat. Once the pot comes to a boil, turn down to medium to simmer and set your timer for 30 minutes.

Meanwhile, turn your broiler on high, place tomatoes and jalapenos on baking sheet with aluminum foil underneath- put tomatoes and jalapenos in broiler for 12 minutes.

Start dicing up 3/4 of your onion, turn chicken, tomatoes and jalapeno to make sure all side are being cooked. After 12 minutes put tomatoes into a blender, slice jalapeno in half, de-seed and peel off the skin. Pour remaining juices from the pan into the blender, take out garlic cloves from the chicken pot and put into blender. Place additional garlic clove into blender as well. Puree the tomato-jalapeno mixture until smooth.

Once chicken is done take out of pot and place on a plate to cool. Discard the bay leaves and pour the chicken liquid into a bowl for later use. Drizzle olive oil into the same dutch oven or sauce pan and saute the diced onions for about three minutes, or until they are golden- on medium heat. After the onions are golden, pour in the tomato-jalapeno puree. Change heat to medium-high and bring to a simmer. Add in 3 cups of chicken stock liquid and let the sauce cook down- about 20 minutes.

After the chicken has cooled, shred chicken and discard skin, bones and icky stuff. Add in Mexican crema and half of the queso fresca, let sit until sauce is ready.

Get oil ready for frying in a skillet or saute pan. When tomato-jalapeno sauce is ready pour 1 1/2 cups onto the bottom of a 13x9 deep, baking dish. Save extra chicken stock and tomato-jalapeno sauce for later use, think soups, rice, pasta or chicken!

Fry tortillas 20 seconds per side, immediately stuff about 2 Tbs of chicken mixture into each tortilla roll up, seam down. (This is easier as a two person job.) Once all tortillas are stuffed, sprinkle any extra chicken on top then pour another cup of the sauce on the enchiladas. Sprinkle with remaining queso fresca and remaining sliced yellow onion.

Bake at 375 for about 20 minutes or until hot and cheese has melted throughout. While enchiladas are baking put can of black beans into a sauce pan with olive oil and heat up. To plate pour beans on the plate then pile enchiladas on top with additional queso fresca. If this doesn't make you want to drink a margarita, I don't know what will!

xo Lo

Tuesday, July 19, 2011

Dill Salmon with Quinoa, Cucumber Salad & Fresh Peas

In the heat of summer, seafood dishes are refreshing and exciting for the palate. Salmon is a common fish that most people prefer, dill is a beautiful herb to enlighten the flavors in any salmon dish. Recently, I've been digging into quinoa, one of the most amazing grains available. This is the one grain that is a protein versus a carbohydrate and can take on almost any flavor you pair it with. Cucumber salad is one of my personal favorites for summer, the coolness of the yogurt sauce and the spike of the dill is a gorgeous combination in hot temperatures. Peas are an easy veggie to chef up, I always add them into a saute pan with olive oil, salt, pepper and garlic.


For this recipe, I took a filet of salmon added olive oil, salt, pepper and dill then set aside to let the flavors merry. I grabbed the quinoa, added it to a saute pan with olive oil and let the quinoa get toasty, after a few minutes I add chicken stock, this will enhance the flavor of any grain or pasta dish. Next I created a yogurt sauce with one cup of plain Greek yogurt, dill, garlic, salt and pepper. I place this yogurt sauce into the fridge to let the flavors come together. Next I thinly slice the cucumber, sprinkle with salt in a colander and let sit to drain out the water.

Next, I check on the quinoa, give it a stir then I grab some yellow onions, dice them up and throw them in a saute pan with olive oil, these will go into the quinoa when it has absorbed the chicken stock. This dish has a lot of components that are time sensitive. It is important not to cook the salmon right away because it cooks so quickly that it'll be waiting for the other dishes to finish and get cold.

Once the quinoa is absorbed, scoop it into the saute pan that is holding the onions and stir. Rinse the cucumbers, add the dill-yogurt sauce and place back into the fridge to chill. Stir the peas, turn the heat lower (peas cook quickly). Finally, place your salmon onto the grill pan with olive oil. Salmon does not need a lot of time to cook, you want a crispy sear on the outside and a velvety medium-rare inside. Which means you only need to cook the salmon for 2 minutes on each side, unless you prefer well-done fish then you would cook it for about 4 minutes on each side.

Time to plate, place the salmon on the dish, the creamy onion quinoa, fresh garlicky peas and refreshing, cool cucumber salad. This dish will make you love summer nights!

xo Lo

Friday, July 15, 2011

My favorite meal of the day

What is your favorite meal of the day? Mine is hands down breakfast! Everything about breakfast makes me smile, the smell of coffee brewing in the wee hours of the morning, getting settled on my comfy couch with a book before anyone else in the house wakes up. Then as my tummy grumbles I decide what to make. On this particular day I was feeling a bit over-worked from having a bit too much fun the day before so I knew I needed a good breakfast fix. Pancakes with a fried egg on top smothered in Maple syrup...mmmm! This dish will get your sugar levels back on track, add some healthy protein and carbs, before you know it you'll feel back on track to conquer the day.

The recipe I used:

Pancakes:
1 1/2 cups of 1/2 whole wheat flour & 1/2 organic unbleached flour
2 large organic eggs
3 Tbs sugar
1 Tbs baking powder
a pinch of salt
pinch of fresh nutmeg
1 1/4 cups of organic milk
1/2 tsp vanilla extract
3 Tbs extra virgin olive oil

Combine dry ingredients into a bowl and wet ingredients into a mixer. After blending separately add wet ingredients to the dry ingredients and fold together. Oil up your skillet and add 1/2 cup of the pancake batter, let sit til bubbles appear on the sides then flip and continue.

Eggs:

Grab a few large eggs
salt & pepper

Make sure your skillet is hot with olive oil in it, crack the egg gently into the skillet. Add a pinch of salt and pepper on top. Once the egg starts bubble on the sides, gently flip. Turn your skillet off, assemble your pancake on the plate, top with the egg then smother with Maple syrup and dig in!

What did you think of this recipe? xoxo Lo