Showing posts with label family. Show all posts

Thursday, July 16, 2015

What's the story morning glory?

Sometimes you just need breakfast on the go. And of course, the healthier the better. Since my daughter is now in full eating solids mode, I try to be versatile and prepare the healthiest foods I can.

This morning, in between Chuggington episodes, my daughter's giggles, and me attempting to work out, I threw this recipe together.

Morning Glory Muffins
1 1/4 cups flour
1 Tbsp baking powder
1 Tbsp sugar
1/4 tsp salt
1 cup buttermilk (or any milk)
2 Tbsp coconut oil (or any oil)
2 Tbsp water
1/2 cup shredded carrot
1/4 cup raisins
1/2 cup shredded coconut
1 mashed banana
1 Tbsp chia seeds
1 tsp hemp seeds
1 Tbsp cinnamon
1 tsp allspice

Mix dry ingredients together, set aside. Mix wet ingredients together, combine with dry. Add in fruit and spices. Oil a muffin tin and scoop into each spot. Bake at 350 for 45 minutes or until a knife/toothpick comes out clean. ***You may have noticed I did not use eggs, I didn't have any so I was resourceful. Great for anyone with egg allergies. Or anyone who has no groceries...like me.***

They are so delicious and my 14 month old gobbled hers down. Perfect for a busy day that needs a boost of healthy energy. Enjoy!

xo Lo

Wednesday, April 22, 2015

Whirlwind

This year has been a whirlwind, with having my first child and working, sadly, my blog has taken a back seat (and a little bit of my cooking). I have cooked some fun, creative dishes and, of course, I forgot my camera in the diaper bag, or in the laundry basket, or next to my bed. You may have noticed my new blog name, I wanted to re-vamp my blog. I am hoping to take it the next level eventually. I just felt like this name was more me. I mean what is better than homemade béchamel or whipped cream?

But, I am getting better at keeping my head afloat now. My little girl is 11 months old, her 1st birthday party (expect a special blog featuring this celebration!) is around the corner. 

Lately, my time has consisted of playing with my daughter, work, and focused on moving (back to Colorado we go!) In the midst of that craziness, I've realized how important it is to take time for what I love. Cooking. There is something about taking a bunch of beautiful, random ingredients and conduct them in a symphony of flavor that produces something that makes you smile. One morning, it was that perfect temperature outside that I wanted to start my morning off with a cup off coffee on the front porch. Mind you this mellow morning lasted about 30 seconds, until my daughter wanted to play in the grass. But hey, I had 30 seconds... :) 

To give my plain 'ol coffee a little bit of fancy, I topped it with a whipped vanilla meringue. Added the perfect pop of sweetness, and just made me feel special. 

After my daughter made it pretty clear this was not a morning of relaxation, I decided to introduce her to pancakes for the first time. Since, she is still being introduced to a lot of foods I chose to kick out the sugar, add in goat's milk (what we've decided to transition her to once she turns one), and I had some mascarpone cheese in my fridge, along with some oranges that needed zesting. And voila! Halen's Pancakes. 

Halen's Pancakes


1/2 cup mascarpone cheese
2 cups flour
1 tsp baking powder
1 tsp cinnamon
1/2 tsp baking soda
pinch of salt
2 eggs
2 cups goat milk (buttermilk or whole milk would work deliciously)
1 tsp vanilla 
zest from one orange
2 Tbsp butter
honey for serving
berries for serving

I started by combining the dry ingredients together. Then I whisked the vanilla, milk and orange zest into the eggs. Then I combined wet and dry ingredients together, I added the butter, being careful not to over mix. Let the batter sit for a few minutes. I got my skillet hot, placed a bit of butter and then I made silver dollar size pancakes for Halen using a tablespoon. For my husband and I, I used a 1/3 measuring cup. 

Once the pancakes are done, I drizzled the adult pancakes with honey and placed a few blueberries and strawberries on top. For Halen's I placed them on her tray along with the berries. Needless to say, she approved! 

My friend's birthday was this past weekend, and with the rising heat I decided a regular cake just wouldn't do. I had seen these watermelon faux cakes on Pinterest and decided to give it a go. I bought a small watermelon, sliced almonds and fruit all from Trader Joes to make this springtime gem. 

Dana's Watermelon "Cake"
one small watermelon
2 kiwis
a handful of raspberries
1 cup sliced almonds
Homemade Whipped Cream 

I sliced the watermelon to model the shape of a small cake, making sure the top and bottom were flat. Then I made my whipped cream. I iced the cake and used my hands to stick the almonds onto the sides of the cake. I sliced up some kiwis and fanned them out on top. I finished by placing a few raspberries on the very top. 


Homemade Whipped Cream
1 cup heavy cream
1 Tbsp sugar

Whip the heavy cream on high, add in sugar. Let beat until peaks start to form. Do not over beat, or you will get butter. 


And for a perfect centerpiece to any dinner table, any celebration you can always make a personalized flower pot. We did this for Valentines Day, and we love using it for all different flowers. Made from yours truly, my dear Halen girl. 


Wednesday, August 6, 2014

Pizza!

My husband LOVES pizza. Every time I ask him what he wants for dinner, his answer is always, "pizza." Sometimes I'll ask him a question that is completely unrelated to food and his answer will still be, "pizza."

I've always wanted to make homemade pizza but I've failed many times...the crust has always given me a hard time. While grocery shopping a few weeks ago I stumbled upon frozen cornmeal crust pizza crusts. I was elated! Finally I could make homemade pizza! They were gluten-free which is a plus for many people and they were smaller so we could still use portion control.

Next I needed to find the toppings, our family friend gave us a jar of her homemade marinara sauce, so we definitely wanted to use that. Then I decided on leeks, chipotle sausage, and mozzarella cheese. But you can put any toppings you like on it. Leeks are a great alternative to onions, especially when they are all caramelized...yum!

Leek-Sausage Pizza on a Cornmeal Crust
2 frozen cornmeal pizza crusts (or make your own or get regular crust)
1 lb chipotle sausage
1 large leek, sliced
1 cup shredded mozzarella cheese
1 cup marinara sauce

I baked my crusts just a tad so they were a little crisp. Meanwhile I sauteed my leeks until they were tender and caramelized. I also cooked the chipotle sausage until mostly cooked through. Once the crusts were ready, I ladled the homemade marinara sauce on top, a big scoop of sausage, leeks and finally, shredded mozzarella. Bake in 400 degree oven for about 10-15 minutes. This pizza was outstanding, we can't wait to make it again.

We served this with a simple romaine lettuce salad, raw mushrooms and southwest cheddar dressing.

This is a fantastic meal if you need to whip something up quickly, if you are craving pizza but don't want to ruin your healthy eating habits or just want a yummy dinner for a Friday movie night.

Enjoy! xo Lo


Monday, July 14, 2014

Chicken Milanese

Chicken Milanese is one of those iconic dishes that seems to be forgotten or skipped over. I wanted to rejuvenate this recipe a bit.

Chicken Milanese

chicken breasts (2-4)
1 cup panko bread crumbs
1 cup flour
2 eggs
fennel bulb
cherry tomatoes, halved
garlic
1/2 cup cream cheese
penne pasta
 salt
pepper

Preheat oven on the lowest setting, 150-170.

Boil water for the pasta, put plenty of salt in the water, once bubbling add in whichever pasta you prefer, I used penne.

Take your chicken breasts and pound them until they are about a 1/2 inch thick. Sometimes the breasts are so large I cut them in half. In three bowls add flour, salt and pepper in one, eggs in the second and panko in the third. Dip the breasts into the flour, then coat with the eggs and dredge in the panko bread crumbs. Once pasta is al dente, drain.

Brown each side of the chicken using olive oil in a hot pan, about three minutes per side. Then place the coated chicken breasts on a baking sheet with a wire rack on it, put in the oven to cook through and keep warm.

In the same pan you browned the chicken in, add in the fennel, let it cook until soft. Then add in the garlic and lastly the tomatoes. Once the vegetables are soft, add in the cream cheese to create a creamy sauce. Retrieve the chicken from the oven. Spoon pasta in bowl, top with crispy chicken and finally the creamy sauce. I garnished with a little of the fennel sprigs. The panko makes this chicken even more crispy and slow cooking makes the chicken extra moist. The bite from the fennel and creaminess from the sauce makes this dish irresistible. Any guest will love this meal.

Enjoy! xo Lo


Pass the dessert please!

I have been on quite the hiatus since I gave birth to my daughter two months ago. It has been a whirlwind and I'm finally starting to feel more settled. Halen is my gorgeous daughter and I love her more with every breath she takes.

My dad and his girlfriend were coming over for dinner so I wanted to make a special dessert. As always, I looked around my pantry to see what I had. I had Nutella and almonds. I decided to make mini cheesecakes. I grabbed cream cheese and almond crisp cookies from the grocery store and got to work.

Nutella Cheesecake
3/4 package of cream cheese

2/3 c Nutella
1 tsp vanilla
12 crisp cookies
2 Tbsp butter
1/2 chopped almonds

The best thing about this cheesecake is it does not require baking, which makes it super easy to put together and set aside until your guests arrive. In a hand mixer or standing mixer, blend the cream cheese and Nutella together. Add in the vanilla when well blended, set aside.

You can use any kind of cookies you want, I decided to use thin, crisp almond cookies. I took about 12 and crunched them up until they were in tiny pieces. Then I mixed them with melted butter. To give this dessert some extra special flair I decided to use my grandmother's old tea cups. I pressed the cookie mixture into the bottom and then spooned the Nutella mixture on top. Then I put them into the fridge; you want them to chill for at least two hours before serving.

Once our dinner was finished I retrieved the cheesecakes, topped them with whipped cream (usually I make mine homemade...but alas being a mom you learn to cut corners sometimes) then topped each individual cheesecake with some chopped almonds.

They were creamy, just the right amount of chocolate with a delicious buttery crunch from the cookie crust and nuttiness from the almonds. A perfect summer dessert!

Mango-Roasted Almond-Oatmeal Cookies

1 cup of almonds
1 cup of oatmeal
1/2 cup of softened butter
1/2 cup olive oil
2 eggs
1 1/2 cups flour
1 tsp baking powder
2 cups dark brown sugar
1 tsp salt
1 cup chopped, dried mango

Instead of the typical oatmeal-raisin cookie, I wanted to step it up a notch. I ended up having dried mango and almonds, so I decided to use those.

Pre-heat oven to 350 and lay the almonds on a baking sheet. Roast for about 5-10 minutes.

Mix dry ingredients in a bowl, set aside. Mix butter, olive oil and brown sugar in a mixer. Add in eggs and vanilla. Slowly add in dry ingredients. Once fully mixed, add in oats. Lastly, add in almonds and dried mango.

Use cookie scoop to lay on baking sheet. Bake for about 9 minutes and let cool. This cookie is a great vehicle to add in any types of nuts you may have in your pantry or dried fruit. Makes for a more exciting, delicious cookie!

Hope you enjoy! xo Lo

Saturday, April 5, 2014

All Wrapped Up- Part One: Making Frozen Meals for Family

Now that I am 36 weeks pregnant I am making all those last minute preparations for our sweet girl's arrival. Of course, one of my biggest concerns is food...what will we eat? Thankfully, my best friend has rounded up some helpful family and friends who have offered to cook us meals during those first few weeks home with our Halen. But I know they can't provide every meal for us, so I've decided to do a frozen food series for new moms, families on the go or even for family reunions.

My first recipe for my frozen food series is breakfast burritos. My husband and I are huge fans of breakfast...especially me. So I wanted to make sure we'd have something yummy and satisfying when we're up in the wee hours.

Breakfast Burritos

24 tortillas
10 eggs
1 package of sausage
1 can black beans
2 large red potatoes
1 cup (+) colby jack cheese
salsa

When I originally found this recipe it wanted everything to be pre-made, frozen hash browns, etc. Well even though I am trying to save time by making food ahead doesn't mean I want health aspects to suffer. So I bought everything as naturally as I could and cooked it all myself. You can get any tortillas you like, I really like the ones that are half flour, half corn. Eggs, I always purchase free-range, brown eggs. For the sausage, I purchased hatch green chile sausage for a bit of a kick. I love my black beans and think they add not only extra protein to my burritos but they're so yummy. Red potatoes are healthier than your regular potatoes, colby jack cheese melts really well. And any salsa you prefer.

First thing you want to do is dice up your potatoes rather small and cook them in a large bottom
skillet with some olive oil. Once they start to brown, add in your diced sausage (you can also use ground sausage). Once those two are fully cooked and on the crispy side, scramble your eggs and pour them in the skillet. Turn your heat down and gently fold in your egg mixture. Add a pinch of salt and pepper, continue to fold. Once the eggs start to hold together and don't look runny you're about done. Add the egg mixture into a bowl and set up your wrapping station.


 You'll need plastic wrap, two large freezer Ziploc bags, your grated cheese and black beans ready to go. I would tear a few pieces of plastic wrap at a time so I didn't have to stop my process each time I needed more plastic wrap. Lay your tortilla down on the plastic wrap, fill with egg mixture, top with grated cheese, and a spoonful of black beans. Use the plastic wrap to wrap up the breakfast burrito nice and tight and set to the side.
Continue process until you've used all your eggs and tortillas. Then date and label your freezer bags, add the wrapped breakfast burritos inside, let out all the air, zip shut, and add into your freezer.


When you're ready to eat your frozen breakfast
burritos, simply take the number you want out of the bag, heat up add salsa on top and dig in! These are perfect for any mom-to-be preparing for her little one to come home, for a mom on the go preparing food for her family or even preparation for a family reunion coming up (since summer is around the corner!).

Enjoy! xoxo Lo

Friday, January 17, 2014

Early bird gets the worm!

It seems the older I get (and the more pregnant I get) I rise even earlier each morning. And of course what good is a morning without a delicious breakfast? In this post I have compiled two of my favorite breakfast items.

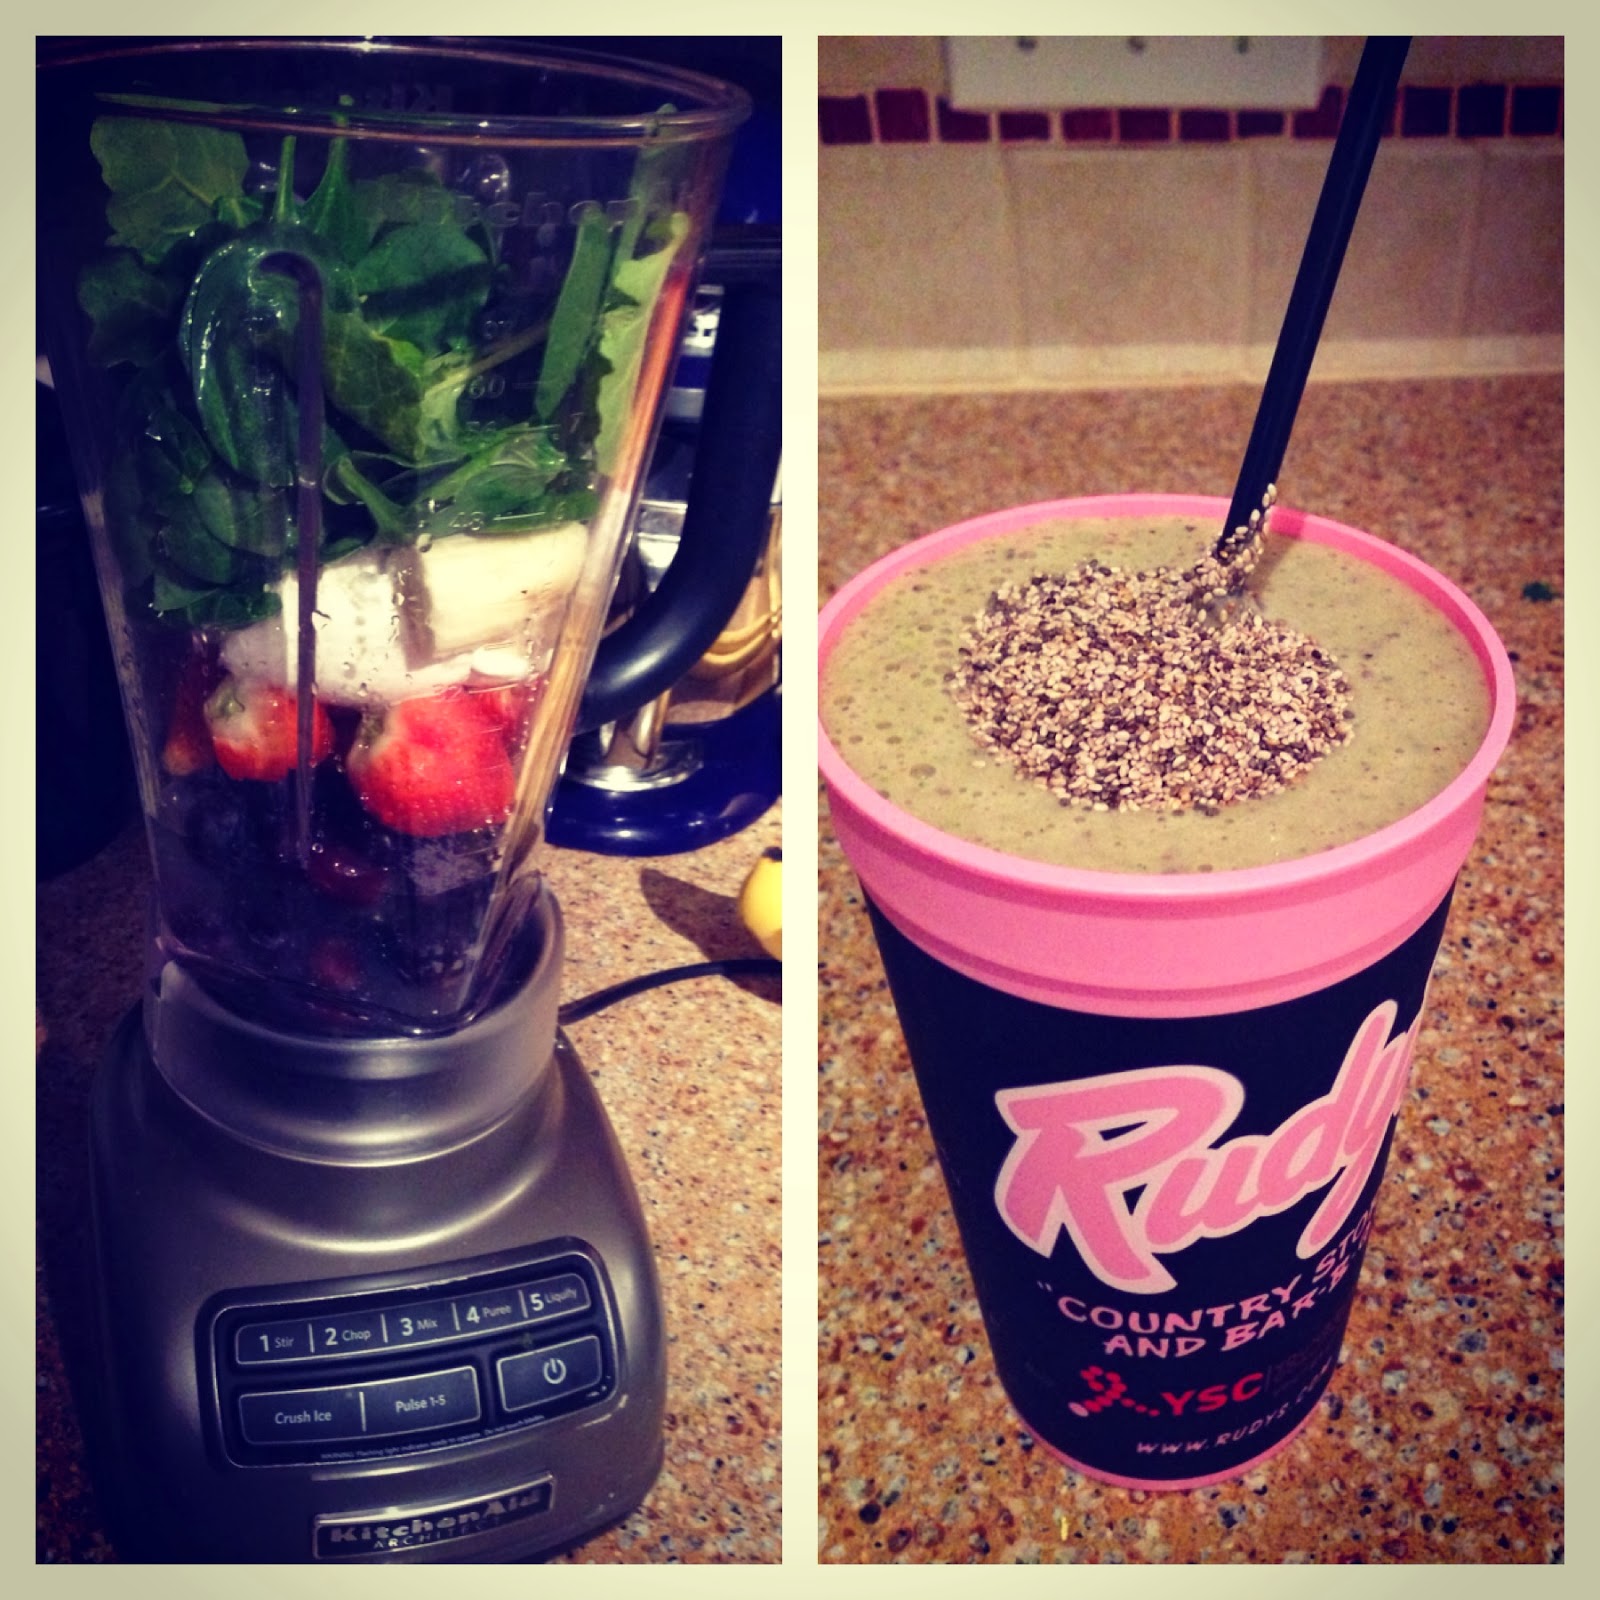
On week day mornings I try to be as healthy as possible...smoothies are the way to go. And so easy! You can add just about anything you want or have on hand into your blender and puree up a scrumptious, healthy start to your work day.

Mean Green Smoothie
3/4 cup Greek plain full fat yogurt
1 banana
1 cup of juice/milk
1/2 cup blueberries
1/2 cup raspberries
1/2 cup strawberries
1 cup spinach/kale mix
1 Tbsp honey
1 Tbsp chia seeds

Don't let the word "green" scare you. Trust me, you won't taste the green in this mean green smoothie. The reason I add spinach and kale into my smoothie is to give myself that extra serving of vegetables that are so good for you. You'll taste the fruit you add into the smoothie. You'll notice that I put different examples of a liquid...I usually use the juice we have on hand (orange or apple) but I've also used coconut water and that tasted great. I use full fat Greek yogurt because I want the healthy fats and love the creaminess it adds to my smoothie. Then I pulse this altogether, once it is pureed I slowly add in a few ice cubes until it reaches the consistency that I prefer. Then when I pour it into my cup, I add chia seeds on top and mix it around before I drink. This adds another punch to the super healthy smoothie. This breakfast will give you so much energy and just make you feel good. For you mamas-to-be this is an awesome pregnant breakfast, great for you and amazing for your growing baby.


Quinoa-Citrus-Currant Muffins
2 cups of cooked quinoa (follow instructions on bag)
1 1/2 cups flour
2 tsp baking soda
3/4 cup brown sugar
1 egg
1/2 tsp salt
1/4 cup safflower oil
1/2 cup whole milk
1/2 cup dried currants
2 Tbsp orange zest
2 Tbsp fresh orange juice

Mix wet ingredients together in a standing mixer. Meanwhile, add dry ingredients together and mix with a fork until combined. Slowly add in dry ingredients to wet ingredients. Add in currants. Lastly add in juice and zest. Spoon into a greased and floured muffin pan. Bake at 350 degrees for 25 minutes.

The fluffy quinoa gives these healthy muffins a moist texture and the currants give you a pop of tartness. You can really add any dried fruit, fresh fruit or nuts that you have on hand as well. I took these to my best friend who had recently had her first baby, a great treat for a loved one.

Both of these breakfasts are winners and don't take long to make. I hope you enjoy! xo Lo


Sunday, November 4, 2012

Autumn Brunch

Autumn is one of my favorite times of the year, I love cozying up next to the fire with some hot soup or warm cup of tea. I love cuddling with my husband, while the snow falls outside. But most of all I love the seasonal foods...an array of colorful squashes, figs, apple cider, apple butter, freshly baked breads and so much more.

Every fall season I load up on acorn squash, butternut squash, spaghetti squash, pumpkins and sweet potatoes for all my savory delights. This cloudy Sunday morning, I left for church early, while my husband slumbered away in our cozy bed. When I came home, I knew I wanted to create a fabulous Autumn-style brunch.

Pear-Sweet Potato Hash

1 golden bosque pear
1 sweet potato
3 bacon slices
1/4 diced onion
olive oil

First dice up your sweet potato and put in water to boil. While water is heating up, add olive oil in a cast iron skillet, add your diced onion and diced bits of bacon. Let onions cook til translucent. Dice up your pear and add to the skillet, by then your sweet potatoes should be partly cooked, drain the water and add them to the skillet. Cook until the potatoes and pears are carmelized. You could also use root vegetables, regular potatoes or any squash.


In the meantime work on your crocque monsieur:

Pastrami Croque Monsieur

4 slices of bread (any bread you have)
4 slices of pastrami (or any meat you have)
slices of muenster cheese (or any cheese you have)
Dijon mustard
Bechamel sauce (recipe follows)

Make your pastrami sandwiches, spread your dijon mustard on bread and layer with slices of cheese and meat. Place in the oven at 400 degrees until the bread becomes golden and toasty. Meanwhile work on your Bechamel sauce.


Bechamel Sauce

1 stick of butter
5 Tbsp flour
2 cups milk
1tsp thyme (or any spice you prefer, bay leaves work great too)

Melt butter and whisk in the flour. Heat your milk (do not scald) and add in slowly. Sauce should start to thicken, add in thyme, salt and pepper. Let bubble for a few minutes, stirring occasionally, then remove from heat. Your sandwiches should be toasted by now, remove from oven, spoon Bechamel sauce over top of your sandwiches, place a few more slices of cheese and put under broiler for a few minutes (until golden and bubbly).

Soft-Boiled Eggs

4 eggs
water

This way to cook eggs is quite simple. Heat your water in a small saucepan over high heat until a rolling boil. Add in eggs and cook for 4 minutes. Remove the eggs from the water and place in egg cups (or shot glasses). Let cool for a few minutes, then crack the tops off with a butter knife. Lightly tap the knife against the egg shell and peel top off.

Fruit Salad
1 cup blackberries
1 cup sliced bananas
1 cup sliced kiwis
1 tsp lime zest
1 Tbsp lime juice

Slice up your fruit, add fruit to bowl, zest your lime and squeeze half the lime onto the fruit. Mix around and it is ready to serve.


Your guests will absolutely be blown away by this magnificent brunch- the flavors are exquisite, the meal is filling but not overly indulgent. This would be perfect for the upcoming holidays or to make any Sunday morning just a bit brighter.

Enjoy! xoxo Lo

Monday, October 15, 2012

Mountain Getaway


Now that my husband and I live in Colorado, trips to the mountains every so often are essential. This time my husband was bogged down with work so I decided to go all on my own. BUT that didn't mean I had to throw all my meals by the wayside. If this was truly my personal getaway for some solace, I deserved some well-thought out, delicious, soul-warming meals.

October is a beautiful time to visit the mountains, the Aspens are gorgeous hues of yellow, gold and maroon but it is quite cold so you definitely want meals that make you feel comforted.

I decided to make my breakfast for the week before I left:

Uber-Healthy Banana Bread
2/3 cup butter (softened)
1 cup sugar
1 egg
3 bananas
1/4 cup toasted sesame seeds
3 Tbsp chia seeds
1 cup oats
1 1/2 cups flour
1 tsp baking soda
1 tsp salt

Preheat oven to 350 degrees. Cream butter and sugar together, add the egg into your mixer. Toast sesame seeds for depth of flavor. I always freeze my bananas once they start to brown, I throw them in the microwave for a minute or so to thaw and then they are perfect for banana bread. Add them to your mixer, once combined start with dry ingredients. Add in flour a 1/4 cup at a time, then baking soda and salt. Next add your oats and seeds. Once the batter is combined pour into a loaf pan. I use silicone loaf pans and they are fantastic, no sticking! Bake for one hour and let cool for 10 minutes before taking out of pan.

I love banana bread, my mom's recipe is delicious but sometimes I like to change it up. For this recipe I added some super healthy ingredients to help keep my energy up while I was out and about in the mountains. If you have little ones, it's super easy to hide healthy ingredients when baking. Eat while warm and you will be in heaven!


French Onion Soup
2 large onions (sliced thin)
1 Tbsp butter
1 Tbsp vegetable oil
1 carton of beef stock
1/2 cup red wine
Gruyere cheese
loaf of crusty bread

Heat your butter and oil in a medium sized sauce pan. Add your sliced onions and fold into the butter mixture so each onion slice is coated. Let the onions carmelize and cook down for 10-15 minutes or so. While enjoying your getaway with a glass of wine, pour about 1/2 cup into the onions. Let alcohol cook off and dry the onions, about 5 minutes. If you have flour on hand (I
 didn't) sprinkle a little to coat the onions, this

helps the soup become thick. Next add in the beef stock and let reduce down for another 15 minutes. While soup is cooking down, slice a few slices of bread and sprinkle Gruyere cheese on top, put them in the broiler to get all bubbly. Once soup is ready, ladel into bowls, place a slice of bread topped with the bubbly Gruyere cheese and dive in. This soup warmed up my frigid soul right away while sitting by the fire, gazing out the window at gorgeous snow-capped mountains.

Chocolate-Raspberry Tiramisu
6 oz container of marscapone cheese
2/3 cup heavy cream
1/2 cup sugar
2 1/2 cups espresso (warm)
2 packages of Lady Finger cookies
chocolate shavings (garnish)
2 packages of raspberries

Chocolate Zabagilone
2 Tbsp heavy cream
1/4 cup dark chocolate chips
4 large egg yolks
1/3 cup sugar
1/4 cup prune juice (or Marsala)
pinch of salt

Scoop your marscapone cheese out of the container into a large bowl, set aside so it can reach room temperature. Meanwhile, beat the heavy cream and 1/4 cup sugar in a standing mixer until soft peaks start to form. Fold this whipped cream into the marscapone cheese, set aside while you make your chocolate zabagilone (mousse mixture).

Add two tablespoons of cream and chocolate bits to a small saucepan. Cook over medium heat, stirring often until smooth and melted. Set aside and keep warm.  Whisk the egg yolks together, add the prune juice, sugar and salt until well blended in a glass bowl. Set bowl over a saucepan of simmering water, do not allow the bottom of the bowl to touch the water. Whisk the egg mixture over the simmering water until thick and creamy, about 4 minutes. Remove from heat, fold egg mixture into chocolate mixture. Cove and chill in refrigerator for at least 30 minutes.

Once chocolate mousse is chilled, fold into the marscapone mixture. Then chill this mousse completely, about another 30 minutes. Meanwhile brew your espresso and pour into a bowl, whisk remaining 1/4 cup of sugar until dissolved. Find your glass trifle container and dip your lady finger cookies into the sugary espresso mixture, place on the bottom of the trifle. Be quick when dipping the cookies because they are fragile and will fall apart fast. Once mousse is cooled, you will spoon the mixture over the first layer of cookies, top with a layer of raspberries and chocolate shavings then repeat until you've reached the top of the trifle. End with a layer of raspberries and chocolate shavings. Let cool for about six hours before serving so the layers can marry together.

You can also put this in a loaf pan if you don't have a trifle, then when you serve you'll place the solidified tiramisu on a serving platter (what I did in the picture above). My company loved this dessert so much I am thrilled to share it with my family for Christmas!

When you spend a getaway on your own, it is a perfect time to make your favorite recipes or try out new ones you can potentially share with company. As much as I love writing, it's time for me to spend some time outdoors in the gorgeous mountain air!

Enjoy! xoxo Lo


Tuesday, August 28, 2012

Italiano Rustica

I love looking at separate ingredients and watching them marry into one fabulous, delicious meal. Italian food is a house favorite and one of the meals I truly love to make, tweaking it every time I make it.


Grilled Flank Steak
2 pounds of flank steak
1 Tbsp olive oil
salt
pepper
1 clove of crushed garlic

I chose flank steak because it is inexpensive, versatile and scrumptious! I marinated the steak in olive oil, salt, pepper and crushed garlic for 20 minutes, while I got my sides ready.

Cilantro Pesto Linguine
1/2 box linguine (or whole, depending on your guests)
1/2 cup cilantro
1/4 cup olive oil
1/2 cup parsley
1/4 cup parmesan
salt
pepper

I use either chicken stock or salted water to cook my pasta in (whichever I have). Add the pasta when the liquid is boiling with a bit of olive oil, so the pasta won't stick. While the pasta cooks, roughly chop your cilantro and parsley. Add all pesto ingredients together in a deep bowl and use an emulsion blender (or regular blender/food processor) to combine. Once pasta is done, lightly toss in the pesto and keep warm.

Roasted Carrots & Parsnips

bundle of carrots
bundle of parsnips
olive oil
salt
pepper

Rinse your veggies and slice lengthwise, toss in olive oil, salt and pepper and roast at 400 degrees for 20 minutes.

By this time you should be able to put your steaks on the grill, cook 4-5 minutes per side. Let rest for 7 minutes before slicing.

When plating, add pasta on the plate, slice steak and add to plate and finally the veggies. This meal is loaded with healthy carbs, protein and several other nutrients, plus it was at a low cost!

Try this next family get together, everyone will be pleasantly surprised. Enjoy! xoxo Lo


Monday, June 18, 2012

Concert in the Park

After moving to Colorado I took a break from unpacking and had a fun evening out with my family. We sat on a huge hill covered in soft grass which overlooked a stage with a fun, 40s style band playing swing music. With a sigh of relief and oncoming relaxation I opened my picnic bag and pulled out the goodies I prepared for this special event.

A few hours earlier I created the following: summer salad, cheese wheels, strawberry cheese and crackers plus date cakes and chocolate puffs.

Summer Salad
the rest of the box of campanelle pasta
bag of frozen brussel sprouts (or fresh)
two strips of bacon
1/2 red onion
canellini beans
one fresh tomato
red pepper flakes
salt
pepper
smoked paprika

Cook the rest of your campanelle pasta, while the water is boiling cook your bacon in a cast iron skillet.  Once the water is boiling add your pasta. Once the bacon is mostly crisp, remove and lay on a few paper towels to de-grease. Pour your brussel sprouts into the bacon grease to saute, add in half the onion, some salt and pepper.

Once the pasta is al dente, pour in a colander and put in a large bowl to cool. Crumble the strips of bacon into the bowl of pasta, dice up the tomato and add into the bowl as well. Once the brussel sprouts are done, let cool on a cutting board. Dice up the rest of the onion and add to salad. Slice up brussel sprouts into thin slices and add in spices. Mix this salad up and let the flavors merry while cooling in the fridge. After an hour or so of cooling the summer salad should be ready to dive in to.

Cheese Wheels
1/2 puff pastry
white cheddar
blue cheese (or any cheeses you have)
cherry tomatoes
capers

You can really use anything for these cheese wheels, any kinds of cheese, veggies or meat. I happened to have a white cheddar blue marbled cheese, leftover cherry tomatoes and capers. So I rolled out my puff pastry and layered my cheese, tomatoes and capers, then I rolled up the puff pastry like a jelly roll. I used an extra sharp knife to slice half inch pieces and then set them on a greased pan. I baked them for about 15 minutes (as soon as the puff pastry is golden).

Strawberry Cheese and Crackers
5 sliced strawberries
marbled white cheddar blue cheese (or any cheese)
wheat thins (any crackers)

This is very simple, but since I was using a mixed blue cheese, strawberries added a depth of sweetness to the harsh tones of blue cheese, not to mention this made the simple snack that much more summer.


Almond- Date Cakes with a Honey-Chocolate Drizzle
12 dates
1 cups of almonds
1 cup of chocolate covered almonds
1 tsp cinnamon
1/2 cup sugar
4 eggs separated
2 tsp lemon zest
1 tsp vanilla
pinch of sea salt

Drizzle
1/2 cup honey
melted chopped chocolate covered almonds

This was such a hit at the concert...anyone will love it! Put the almonds, chocolate covered almonds, cinnamon and 1/4 cup of the sugar into the food processor, process til ground but not a powder. Whisk egg yolks, lemon zest and vanilla together in a separate bowl. Beat egg whites until foamy, add in remaining sugar (tablespoon at a time), you want soft peaks to form. Fold in yolk mixture, add dates then fold in the almond mixture. Pour into a cupcake pan, I use silicone cupcake holders that way I can continue reusing them. Bake at 350 degrees for 20-25 minutes.

For the drizzle, pour honey into a bowl add the chopped chocolate covered almonds and melt in the microwave (about 30-45 seconds- don't overcook). Drizzle this over the cupcakes and top with a few sunflower seeds. Then enjoy!

Chocolate Puffs
1/2 puff pastry
chocolate candies
honey

This dessert is super easy and definitely a kid pleaser! Take a snack size chocolate candy and take a small square of puff pastry, drizzle a bit of honey and wrap all the sides around the chocolate. I used a kit kat type candy but snickers are good to use or anything really. Bake at 350 degrees until the puff pastry is golden, about 15 minutes.

Create all these awesome snacks and you are sure to have smiling faces, enjoying some live music outside on a summer night.

Enjoy! xoxo Lo


Saturday, June 16, 2012

Rustic Campanelle

I have been on a hiatus as my husband and I made our move west to Colorado. We are very excited to be immersed into such a nature-rich atmosphere. We can't wait to explore and I can't wait to incorporate all of my organic, mountain-living knowledge into my cooking!

The first meal I made in our new home was rustic campanelle pasta with some leftovers that I had from our family's house.

Rustic Campanelle Pasta


1/2 box of campanelle pasta (looks like a cork screw with crinkled edges)
1 package of frozen peas
2 portabella mushrooms
1/2 red onion
chicken stock
marinara sauce
red pepper flakes
parmesan cheese
salt
pepper
olive oil
loaf of homemade bread (or rustic bread)


Now I already had made the peas and mushrooms into a veggie saute for a family meal the night before so I used that to add a bit more texture, nutrients and flavor to my pasta dish. So if you have any veggies side dishes that you don't know what to do with, use them in a pasta dish! Or you can add in the peas and mushrooms from a fresh start.

Firstly heat your chicken stock up to a boil. While the chicken stock is heating up heat up your saute pan with olive oil and crisp up the onions. When the onions turn translucent, add in the mushrooms and peas. When the stock comes to a boil add a drop of olive oil and your pasta. Then let both items cook, your pasta should come to al dente in about 10 minutes (don't overcook or it gets mushy).

Then once the pasta is done, drain in a colander (you can always save the liquid for the next pasta dish!) Pour the pasta into a large serving bowl, add pea concoction, add in red pepper flakes, marinara sauce, salt, pepper and parmesan. Give the pasta a good toss and this rustic, half-leftovers meal is ready for chowing down. My husband loved it and I am sure your family and friends will too! Oh don't forget to break off a big piece of bread and dip that into your sauce....yum!

Enjoy! xoxo Lo

Tuesday, April 24, 2012

Chicken Tostadas

Now that spring is in full throttle it is time for those meals that are fresh, seasonal and healthy for your summer-in-the-making-bod :)

Chicken Tostadas
4 organic chicken thighs
4 organic Ezekial wheat tortillas
1 small can of green chiles
2 cups of washed romaine lettuce
1 can black beans
1/2 cup queso fresco
1 avocado
2 green onions
1 chipotle chile in adobo sauce
1 lime
2 garlic cloves
olive oil
salt
pepper

This meal is so refreshing, will fill you up but still leave you feeling great afterwards. It is better to purchase smaller portions of organic meat then load up on hormone-spiked, manufactured meat. Thigh meat is always flavorful and almost always less expensive. Queso fresco is a nice variation to other cheeses, keeps it light and flavorful. The green chiles and chipotle chile give tons of flavor. The Ezekial tortillas (as well as their other bread products) are incredible for you, packed with fiber and nutrients.


First you'll create your marinade by squeezing out the fresh lime juice, slicing up your garlic cloves and chopping up the chipotle chile in adobo sauce. Then add the chicken and toss, let this marinate for about 30 minutes- two hours. Once the marinading process is done, add to a pan on medium-low heat. While the chicken is cooking, rinse your romaine lettuce and roughly chop- set aside. Chop up your green onions, avocado, crumble your queso fresco and place in small bowls for assembling the tostadas.

Flip your chicken, add your green chiles to a small sauce pan and raise the heat to high, add some salt and slightly char the green chiles. Place the green chiles in a small bowl and set aside. Add the black beans to the same sauce pan, add salt and pepper and heat up. Once the chicken is done, set aside to cool on a cutting board. Add the tortillas either straight onto the burners or onto a pan, heat until crispy. Once the tortillas are crisp, chop up your chicken and start adding the toppings to the tortillas- usually beans start as the base, then chicken, cheese, chiles, avocado, onion and romaine lettuce. Squeeze fresh lime juice on top with a drizzle of olive oil and you are ready to dig into a fantastic spring meal.

Enjoy! xo Lo

Tuesday, April 3, 2012

Mediterranean Seafood Salad

Now that April is finally here, spring has sprung! Which means it's time to kick up our healthy diets and hide away all those heavy, holiday foods. Combining seafood, a light pasta and greens is an excellent way to rejuvenate your body with energy, protein and antioxidants.

Mediterranean Seafood Salad
1/2 pound calamari
1/2 pound shrimp
1 1/2 cups orzo pasta
5 cups herb salad (you can find this packaged together at your grocery store, if not you can pair together any of your favorite herbs: I love fresh dill, arugula, endive, radicchio and spinach)
1 bag of frozen speckled butter beans
1/2 lemon
4 cups chicken stock
2 zucchini
1 yellow squash
1/2 green pepper
3 scallions
olive oil
salt
pepper


First you want to slice your veggies and toss them in olive oil, salt and pepper then place them on the grill for about 4 minutes per side. While the veggies are grilling, heat up your chicken stock to cook the orzo. Once the veggies are grilled, place the squid and shrimp on the grill for two minutes per side. Once they are done, place them on a cutting board to cool before you add to the salad. Heat up your butter beans in a few tablespoons of chicken stock, until tender. Add the herb salad to your large serving bowl, add in the grilled  veggies, cooked orzo, then slice up your squid into rings- add that in and lastly place your beautiful shrimp atop your lovely, earthy, scrumptious salad.

This salad would be perfect for any girls night in, in-law dinner, or just a romantic evening- pair with a bottle of Becker Chardonnay (my favorite) and you're perfecto! Ciao!

xo Lo

Wednesday, March 14, 2012

Texas Pickled Veggies

One of things I've always wanted to learn was how to pickle...I love pickled veggies. During our spring break my husband and I decided to give it a go. We perused through the produce section of our local market and grabbed various veggies to pickle then we got started.

Texas Pickled Veggies
1/2 pound pickling cucumbers
1/4 pound fresh green beans
3 carrots
1 pound of okra
8 cloves of garlic
fresh dill
fresh cilantro
4 Tbsp honey
3/4 quart of white vinegar
6 Mason jars (any size)
pickling spices (coriander seeds, mustard seeds, cinnamon, ginger, bay leaves, red pepper flakes, caraway, allspice, black pepper and cloves- most grocery stores should have a mixed pickling spice you can purchase instead of purchasing all of these separately)


First thing you want to do is sterilize your glass jars. Bring water to a boil and let the jars soak in the boiling water to sterilize. Do not handle these jars with your hands after this point, use tongs.

Next, pour your white vinegar into a large sauce pot, add in the honey and pickling spices bring to a boil. Let boil for two minutes. Then remove from heat and let the liquid come to room temperature.

While the pickling liquid is cooling start to chop your veggies and herbs. With the carrots I sliced them into discs, I chopped the ends off the green beans and sliced up some of the cucumbers into discs and some into spears. I roughly chopped my herbs. Then we started to assemble our veggies into their jars.

You can assemble these any way you want, I decided to put smashed garlic in the bottom of each jar, then in one jar I put all green beans, one was all pickle spears and another was all okra; the rest of our jars we put a mix of veggies. I had six jars to fill, you can also use any veggies you want- some use cauliflower, broccoli, mushrooms, green tomatoes, daikon, etc. 

Once the pickling liquid is cooled to room temperature, add the herbs, stir and gently pour into each jar. Make sure to stuff the pickling spices into each jar, fill to the top and seal the jars together. I put these straight into the fridge, you can leave them in the pickling liquid for 24 hours up to a month or even longer.

Try this awesome recipe out & enjoy! xoxo Lo

Tuesday, March 6, 2012

“Give me a fish and I eat for a day. Teach me to fish and I eat for a lifetime.” -Chinese Proverb

This was my last meal as a non-meat eater. I had some flounder fillets, panko breadcrumbs and some various veggies. For an easy, quick meal I combined all these fresh, healthy ingredients together.

Flounder + Veggies
flounder fillets
1/2 cup panko breadcrumbs
1/4 cup milk
2 Tbsp olive oil
frozen carrots
frozen brussel sprouts
1/2 fresh tomato
salt
pepper


Cook the fish last because it cooks very quickly. Heat your pan on medium-high heat, add one tablespoon of olive oil and add in your frozen veggies, after five minutes add salt and pepper. Stir occasionally and allow the veggies to get crispy. Once the veggies are close to being done, take your flounder and dip in the milk and straight into the panko breadcrumbs. Place on another skillet, on medium-high heat with the other tablespoon of olive oil. Let each side cook for about 2-3 minutes.

Once everything is cooked, slice up some fresh tomato, drizzle with olive oil, sprinkle with salt and pepper - plate the rest of your meal and enjoy. This simple, healthy meal should leave you feeling energized and happy with your dinner decision.

Enjoy! xo Lo

Friday, March 2, 2012

House Divided

For the month of February I gave up meat...I was on my last leg of this meatless 29 day marathon and was running out of ideas for vegetarian/seafood dishes. My husband on the other hand refused to take part in my no-meat-for-me party and requested to remain a carnivore.

I took a look in my pantry and found whole wheat spaghetti, eggplant, ground beef, tomatoes, onion and garlic. I decided to go Italian, for his  meal I would make classic spaghetti and meatballs, for mine I would make crispy eggplant pasta.

Spaghetti and Meatballs
1 pound of ground beef (or turkey!)
1 1/4 cups stone ground oats
1/4 cup milk
1/4 cup flour
1 egg
2 Tbsp finely chopped onion
1 clove minced garlic
1 tsp salt
1/2 tsp pepper
1 box of whole wheat spaghetti (or any pasta)
4 asparagus stalks

Chunky Tomato Sauce
1 large tomato
1 can diced tomatoes
1 clove garlic
2 diced carrots
1/2 yellow onion diced
1 cup chicken stock
1/2 cup water


First start your sauce (or you can use canned), saute chopped onion, then when they start looking golden add in the carrots and tomatos. After a few minutes add in the garlic. Add chicken stock and water to the sauce. Let come to a boil then lower heat to a simmer. Stir occasionally--will take about 30 minutes-1 hour to reduce down to a proper tomato sauce.

Next mix your ground beef, oats, milk, egg, onion, garlic, salt and pepper together (using your hands is best). Make sure the mixture is evenly mixed throughout. Then start to make golf ball sized meatballs, place in a bowl or plate-- once you are finished, let the meatballs refridgerate for about 30 minutes to firm up.

While your meatballs are firming start your water to boil for the pasta.

Once the meatballs are firm, you drizzle a little olive oil in a pan, roll each meatball into the flour mixture (flour, salt, pepper) then brown each side for about 3 minutes per side. Then add to an ovensafe dish. Pour big spoonfuls of the tomato sauce over the meatballs and bake at 325 for 20 minutes. While the meatballs are baking, chop up your asparagus and add to the pan you cooked the meatballs in, saute until crisp and bright green (five minutes).

Crispy Eggplant Pasta
1/2 eggplant (depending on how much you're making)
4 Tbsp flour
salt
pepper
(You will use the above pasta, sauce and asparagus for this dish as well.)


Slice your eggplant in thin slices and put on a plate, sprinkle with salt and let sit for one hour (switch sides at 30 minutes) the naturally bitter juices in the eggplant will ooze out. Once the hour is up rinse in a colander, dip the eggplant (while still moist) into the flour mix and then into the saute pan for about 3-5 minutes per side. You want your eggplant to be brown and crispy.

Once the eggplant is done, meatballs are baked, pasta is al dente and tomato sauce is ready you will plate your dishes accordingly. I sprinkled the sauteed asparagus on each dish for some healthy color. Layer your eggplant pasta with pasta sauce, eggplant, etc. These dishes will surely satisfy any carnivore or herbivore in your home. Never let picky eaters keep you from serving healthy, delicious meals.

Enjoy! xo Lo

Wednesday, February 29, 2012

Indian Made Easy

How many of you love Indian food but when it comes to cooking it at home you have no clue where to start? I LOVE Indian food, the powerful flavors, punchy spices and health benefits keep me coming back for more. Recently I've been trying to incorporate more turkey into our diets, it is low in fat and high in protein. Plus like chicken it is very versatile.

This night in particular I had a package of turkey cutlets, I also had jasmine rice, Greek yogurt and plenty of spices. I combined them altogether for an easy, healthy, delicious Indian meal.

Easy Curry Turkey & Rice

4 turkey cutlets
1 cup Greek plain yogurt
2 cups jasmine/basmati rice
1 1/2 Tbsp curry powder
1 tsp salt + 1 tsp salt
pinch pepper
2 Tbsp butter
3 cups water


First you want to combine your Greek yogurt, salt and curry together into a thick paste. Then chop up your turkey into one inch chunks, add the turkey to the curry paste and use your hands to make sure every piece of turkey is covered. Then cover and let marinate for one hour in the refridgerator.

When the turkey is done marinating, add to an oven-safe pan and bake for 30 minutes at 350 degrees. While the turkey is baking, boil three cups water, add salt and rice. When the rice absorbs most of the water, add in the butter.

When the turkey is done, plate a big spoonful of the rice in a bowl and smother with the turkey and curry sauce. This plate will have your mouth saying "Dhanyawaad!"(Thank you in Hindu).

Enjoy! xo Lo

Tuesday, February 14, 2012

Heart Shaped Love on a Plate

Happy Valentines Day! I know I already blogged about my heart-shaped fried eggs for my fabulous breakfast tacos. But I couldn't resist posting what I lovingly made for my hubby this morning.

Heart-Shaped Pancakes 'n Eggs
1 cup flour
2 Tbsp sugar
1/4 tsp baking powder
1/4 tsp baking soda
1/4 tsp salt
1 egg
1 cup milk
2 Tbsp melted butter
1/2 cup pureed pumpkin
1/3 cup chopped pecans
1/2 tsp cinnamon
1/4 tsp allspice
1/4 tsp nutmeg

Mix the dry ingredients together in a bowl, in a different bowl mix the wet ingredients together then fold the wet into the dry ingredients. Mix til there are little to no clumps in the batter. If the batter is too thick add more milk, if it is too wet add a bit more flour. Grease your pan and put it on medium-high heat. Put your heart-shaped cookie cutter onto the pan and pour the mixture in the cookie cutter just so the batter fills the bottom.  You don't want to fill the cookie cutter up too high or the pancake takes too long to cook. Once the pancake starts to bubble, flip over and lightly push the pancake down, releasing the cookie cutter. Continue until all of your batter is used.

Then use the same pan and cookie cutter for your eggs, re-grease the pan and crack your egg into the cookie cutter. Sprinkle with salt and pepper and cover with a lid. Once the egg is starting to whiten on top the egg is done.

Plate your yummy breakfast together and your honey or sweet kiddos will be pleasantly surprised!

Happy Valentines day everyone! xoxo Lo

Sunday, February 12, 2012

“Laugh as much as you breathe and love as long as you live.”

Valentines Day is right around the corner...There are some great, easy ways to show your loved one how special they are. You can focus on a sweetheart breakfast, picnic lunch, romantic dinner or sexy little surprises throughout the day.

They always say the key to a man's heart is through his stomach...so my plan was to hone in on breakfast because it is my husband's favorite meal. I wanted to start his day off by showing him how much I love him by creating a fantastic, homemade breakfast in bed.

First I started by creating a potato hash.

Fingerling Potato Hash
6 fingerling potatoes
1/4 yellow onion
2 baby portabella mushrooms
1 Tbsp butter
1 tsp salt

Heat your pan on medium heat with butter, add diced onions, potatoes and mushrooms. Continually stir and add salt. These will cook for about 30 minutes.

Homemade Tortillas
3 cups flour
1/3 cup corn oil
1 cup warm water
1 tsp salt

While your potato hash is cooking make some homemade tortillas...which are WAY better than store bought tortillas. Mix the flour and oil together with a fork til the mixture becomes nice and crumbly. Then add in the salt and warm water, spoonful at a time until the mix morphs into a dough. Knead the dough with your hands for three minutes to smooth it out. Then place in a bowl, cover with plastic wrap and let sit for 30 minutes at room temperature. Once the 30 minutes are up, pinch off golf ball size pieces of the dough and roll out on a floured surface. Roll out the dough to a thin, 8 inch disc then place on a saute pan on medium heat and let cook for about 30 seconds then flip. The tortilla cooks fast and will develop little brown spots, to show it is done. This amount of dough should create 10-12 tortillas. After your tortillas are done heat up your black beans and start on cooking the eggs.

Sweetheart Breakfast Tacos
4 eggs
1 Tbsp butter
1 tsp salt
heart cookie cutter
1 cup black beans
1/2 cup shredded colby cheese
1/2 cup roasted salsa
potato hash
homemade tortillas

You can use the same pan that your potato hash is cooking in, push the hash to one side, grease the open side with butter, put your cookie cutter down and crack your egg into the cookie cutter. The egg will solidify inside the cookie cutter creating a heart shape. Cover your egg/hash with a lid until the egg is cooked to your liking. We prefer over-medium eggs, make sure the pan is on medium-low heat. The eggs should cook about 2-3 minutes per egg. When the eggs are done start to plate your breakfast tacos. Put your tortilla down first, then potato hash, black beans, shredded cheese, heart-eggs and salsa.

Serve this up and your honey will cover you with kisses...after they escape their food coma of course :)

Happy Valentines Day! xoxo Lo